

1. Open an interviewer (agent)
You’ll see the interviewer’s header: job title and ID (e.g.627-seasonal-sales-associate), status (Active), timeline (created, active for X more days), budget/spend, subscribers, and Share / Actions.
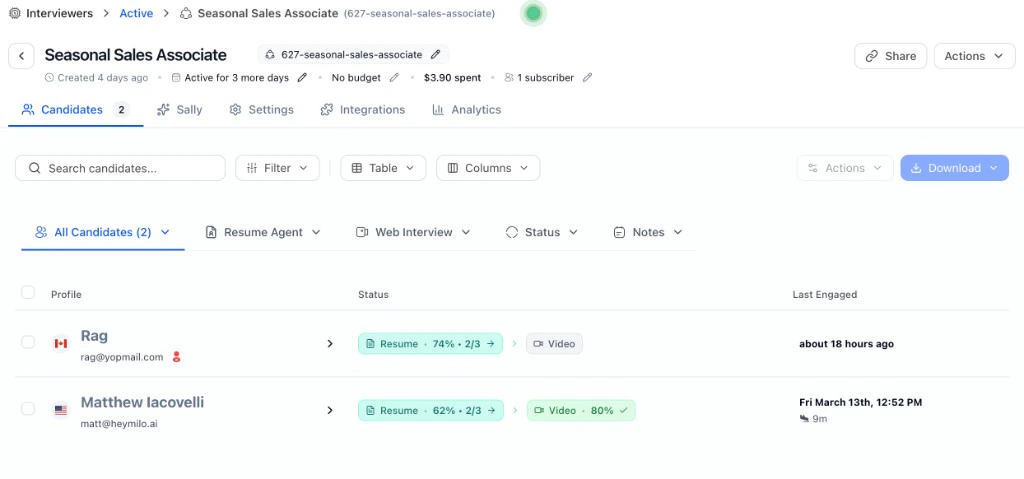
Interviewer open — Candidates tab with list, search, filter, and bulk Actions / Download.
2. The candidate list
The list shows everyone in that interviewer’s pipeline:- Profile: Name, email, and (if shown) location/flag.
- Status: Per stage: e.g. Resume (score or progress like 74% • 2/3), Video (score like 80% or “Video” if completed), or pending.
- Last Engaged: When the candidate last interacted.
Filter by review status
The Status dropdown above the list filters candidates by review decision, with a live count for each:- Pending Review: no decision yet. Every candidate starts here.
- Shortlisted: marked as moving forward via the Shortlist action.
- Dismissed: removed from consideration via the Dismiss action.
- None: clears the filter and shows everyone.
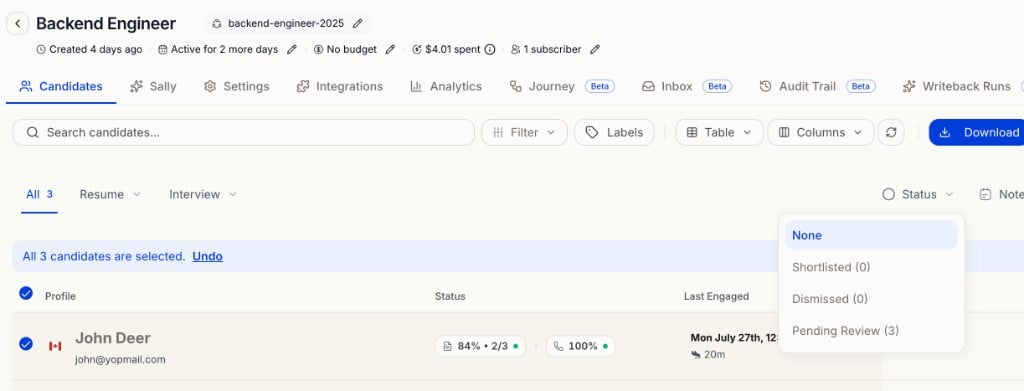
Candidate list — the Status dropdown filters by Shortlisted, Dismissed, or Pending Review.
3. Actions
When you select candidate(s) on the list, a toolbar appears with Download and an Actions (⋮) menu. Use the row checkboxes, or Select all X candidates to grab everyone on the page.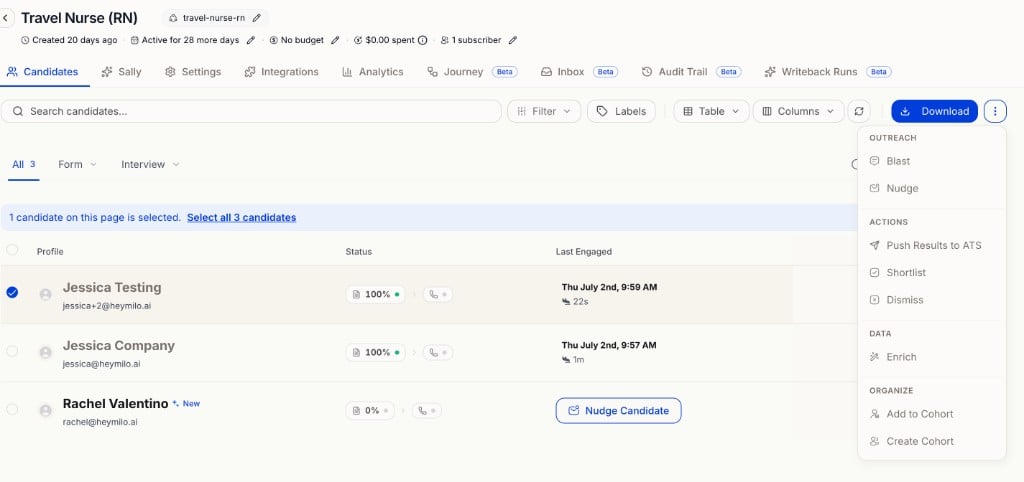
Candidate list — select one or more rows, then use Download or the Actions menu.
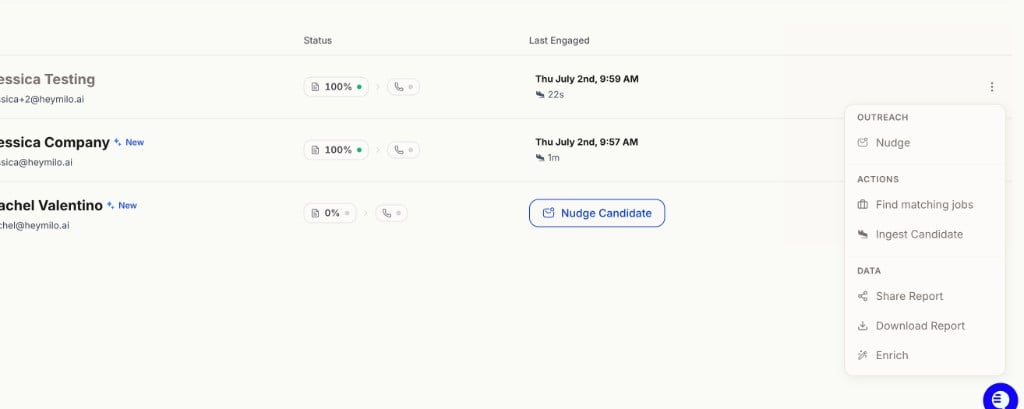
Candidate list — the ⋮ menu on each row.
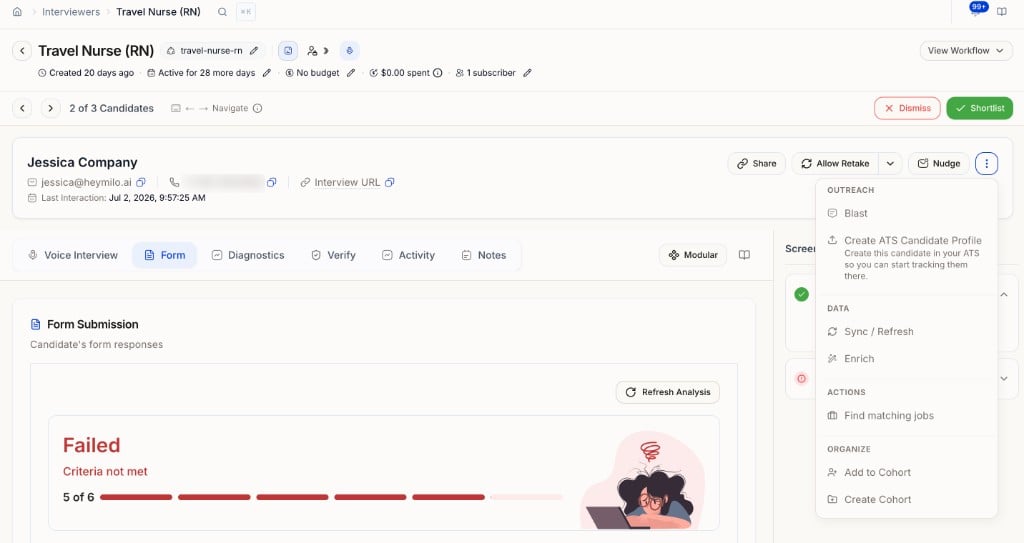
Candidate profile — Shortlist and Dismiss at the top; Share, Allow Retake, and Nudge on the card; more actions in the ⋮ menu.
4. Candidate reports
After candidates finish their interviews, select one or more from the list and click Download. You can check individual rows or use Select all X candidates on the page. The modal header shows how many you picked (e.g. Choose an export for 3 selected candidates or 1 selected candidate).Need to export data across your entire workspace (all candidates, all postings at once)? Use Compliance → Export log → New export instead. See Workspace Exports & Custom Reporting for the full guide.
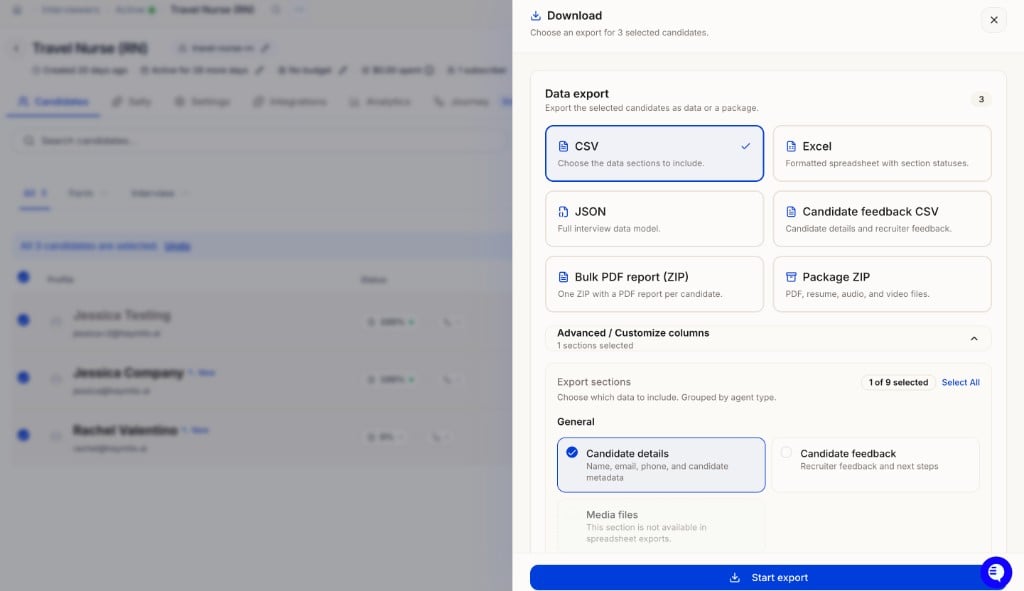
Download — pick a format, customize columns, then Start export.
Expand Advanced / Customize columns to pick which data sections to include. Use Select All or deselect individual sections — you can turn everything off and still export (e.g. a PDF-only run via Bulk PDF report (ZIP)).
Export sections — for CSV and Excel, choose which data to include, grouped by agent type:
Spreadsheet exports also include each candidate’s Shortlisted and Dismissed status as columns. Media files are not available in spreadsheet exports — use Package ZIP for those.
Click Start export when you’re ready. Exports run as a background job and also land in Compliance → Export log (Export History), where you can view details or re-download later.
Sharing a read-only report
Use the Share button on the candidate toolbar to generate a shareable link. Links use your workspace default settings (e.g. public, never expires), or toggle Customize this link to override the access level, add a password, set an expiry date, or control which sections are visible — then click Create link.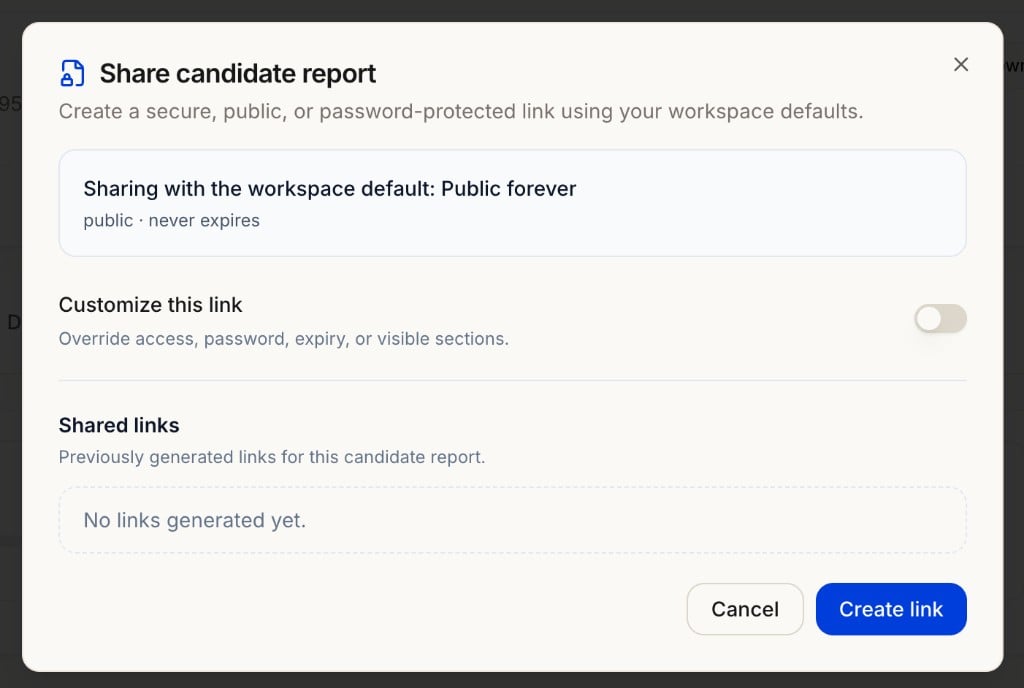
Share candidate report — use workspace defaults or customize access, password, expiry, and visible sections.
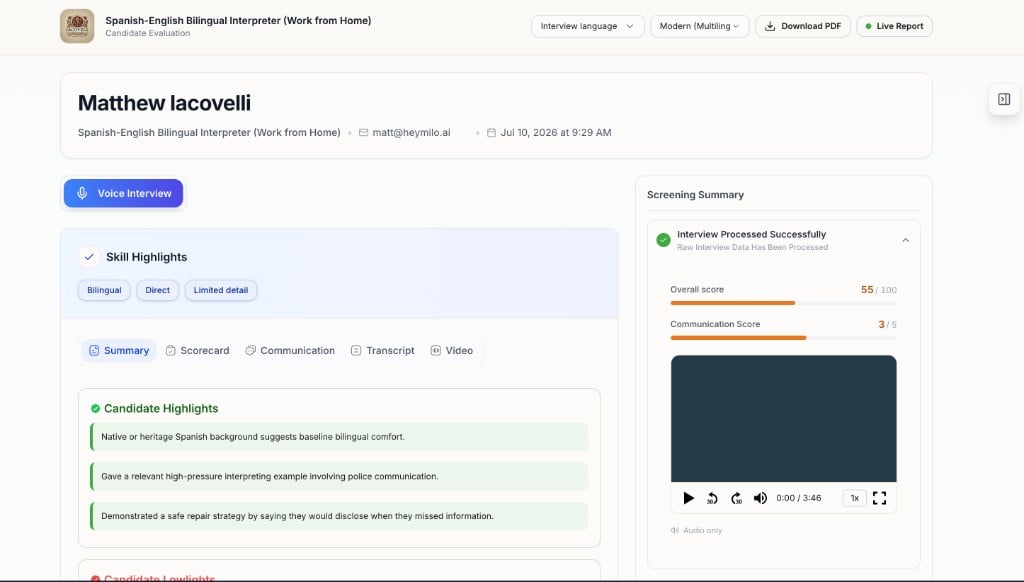
Live report preview — opens when a recipient clicks a shared link or when you use View Report.
5. Click into a candidate
Click a row to open that candidate’s full review.

Interview URL
The Interview URL on the candidate card is that person’s unique link — click to copy it. To get the public apply link shared by all candidates on an interviewer, open the interviewer → Integrations → Inbound → Share Link. To set or change the URL slug when you create an interviewer, see Creating an Interviewer. For a custom domain on interview links, see Custom Domains.Classic vs Modular
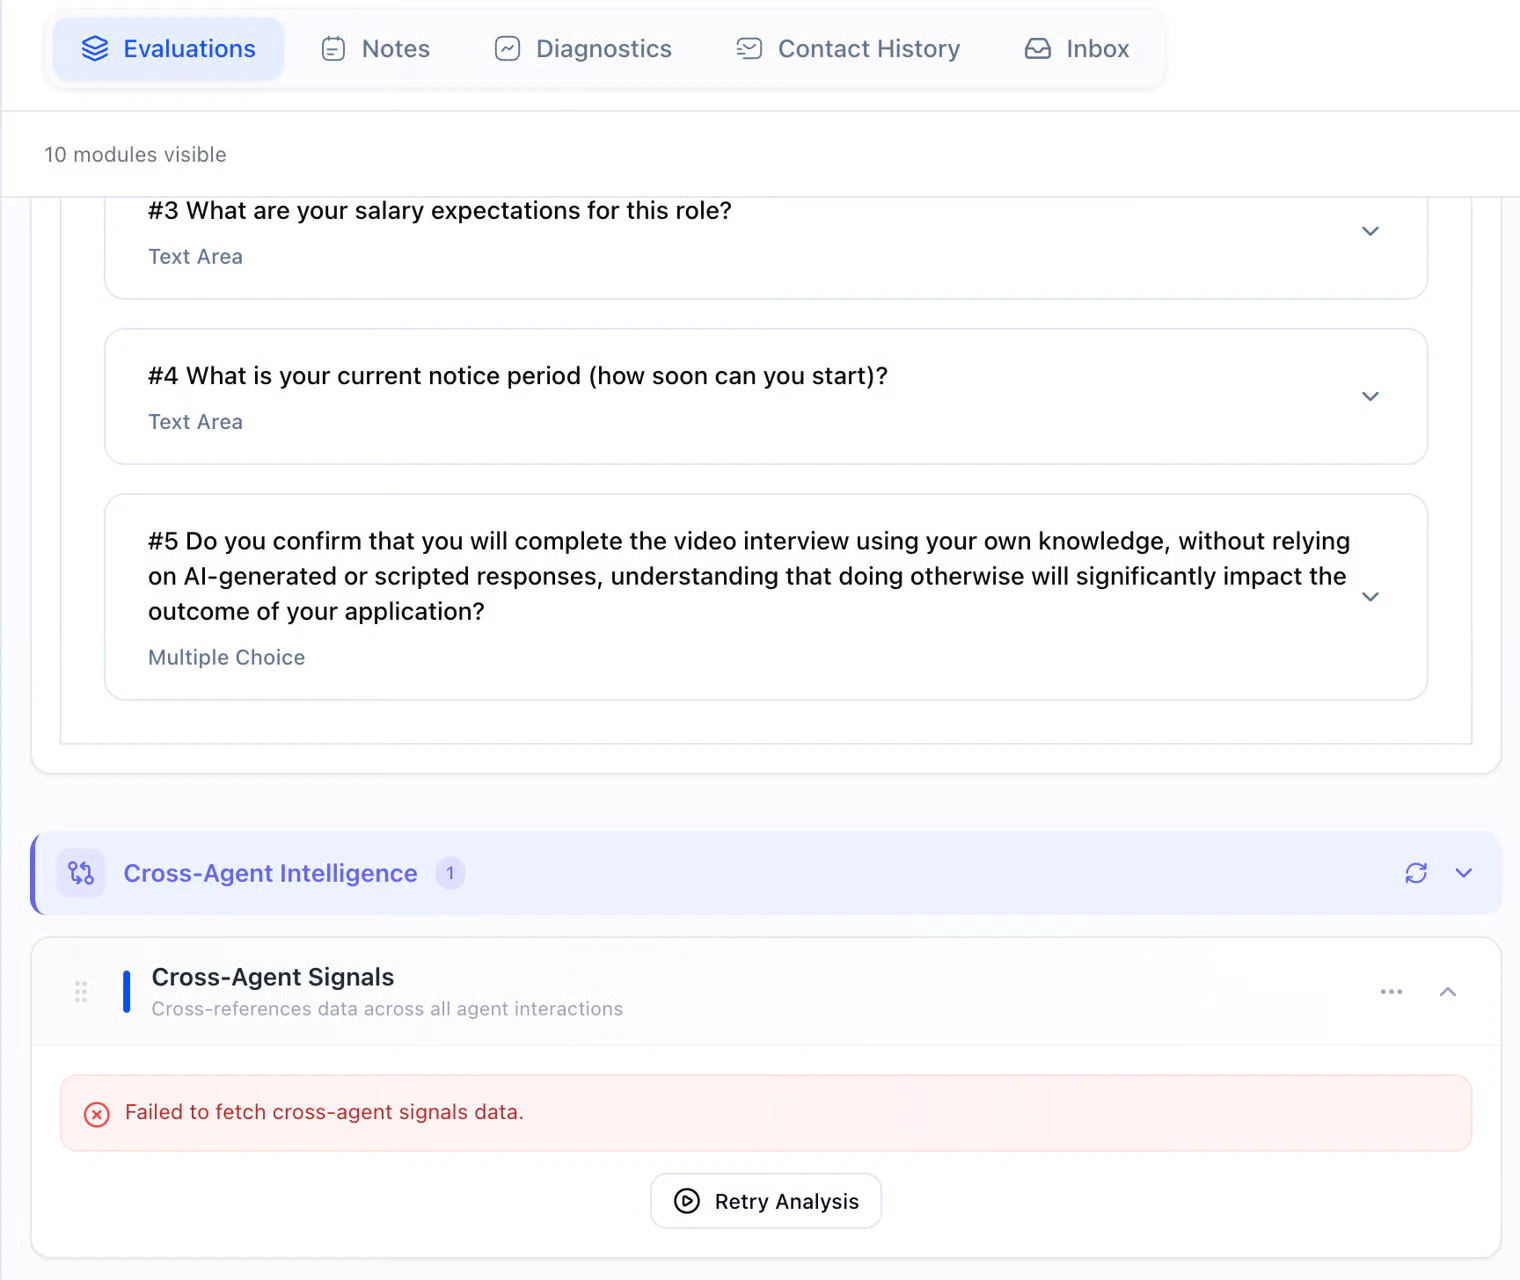
HeyMilo has two candidate review layouts: Classic and Modular. Use Modular on the candidate toolbar to switch. What only changes in Modular- Evaluations tab: Structured modules (e.g. salary, notice period, integrity confirmations).
- When the story doesn’t match: Sometimes a résumé says one thing and the voice or video interview says another. Cross-Agent Intelligence (Evaluations tab) is HeyMilo’s way of flagging those gaps so you’re not the one playing detective across tabs. It’s there for trust and accuracy: dates, titles, skills, or claims that don’t line up between what they submitted and what they said live.
- If the panel is empty or errors out, use Retry Analysis (and Refresh or collapse if that’s what you see). Nothing here auto-rejects anyone. It’s a heads-up for your team before you shortlist, pass, or follow up.
- Find matching jobs: HeyMilo runs an agent process to match this person to other open roles. Open the ⋮ menu → Actions → Find matching jobs.
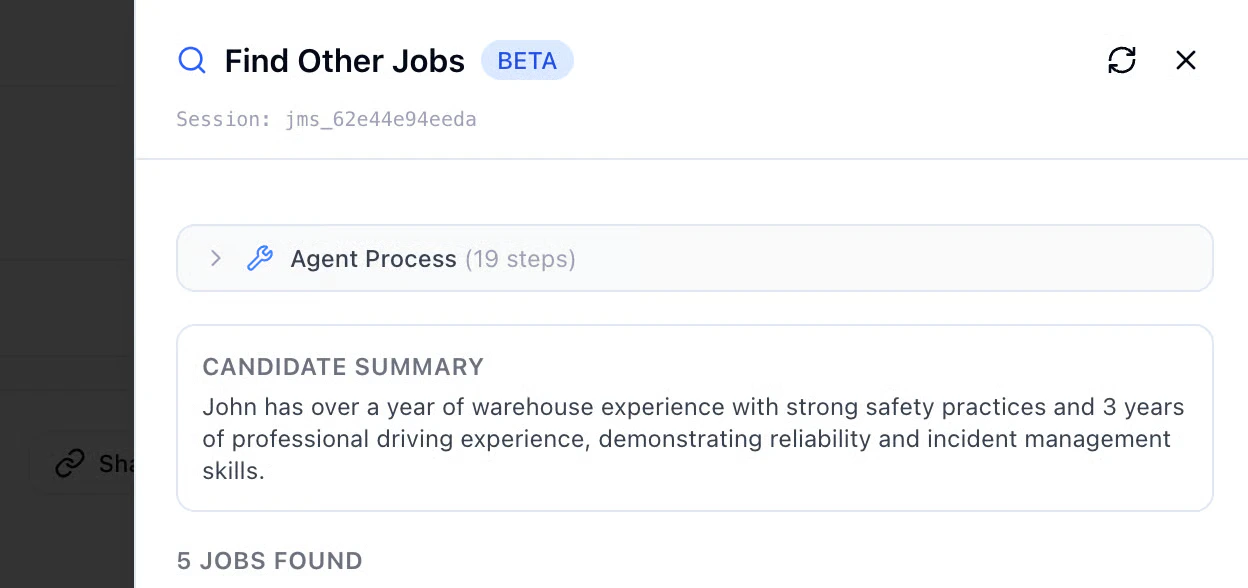
Note: Needs a working ATS connection and relevant jobs/postings for meaningful matches.
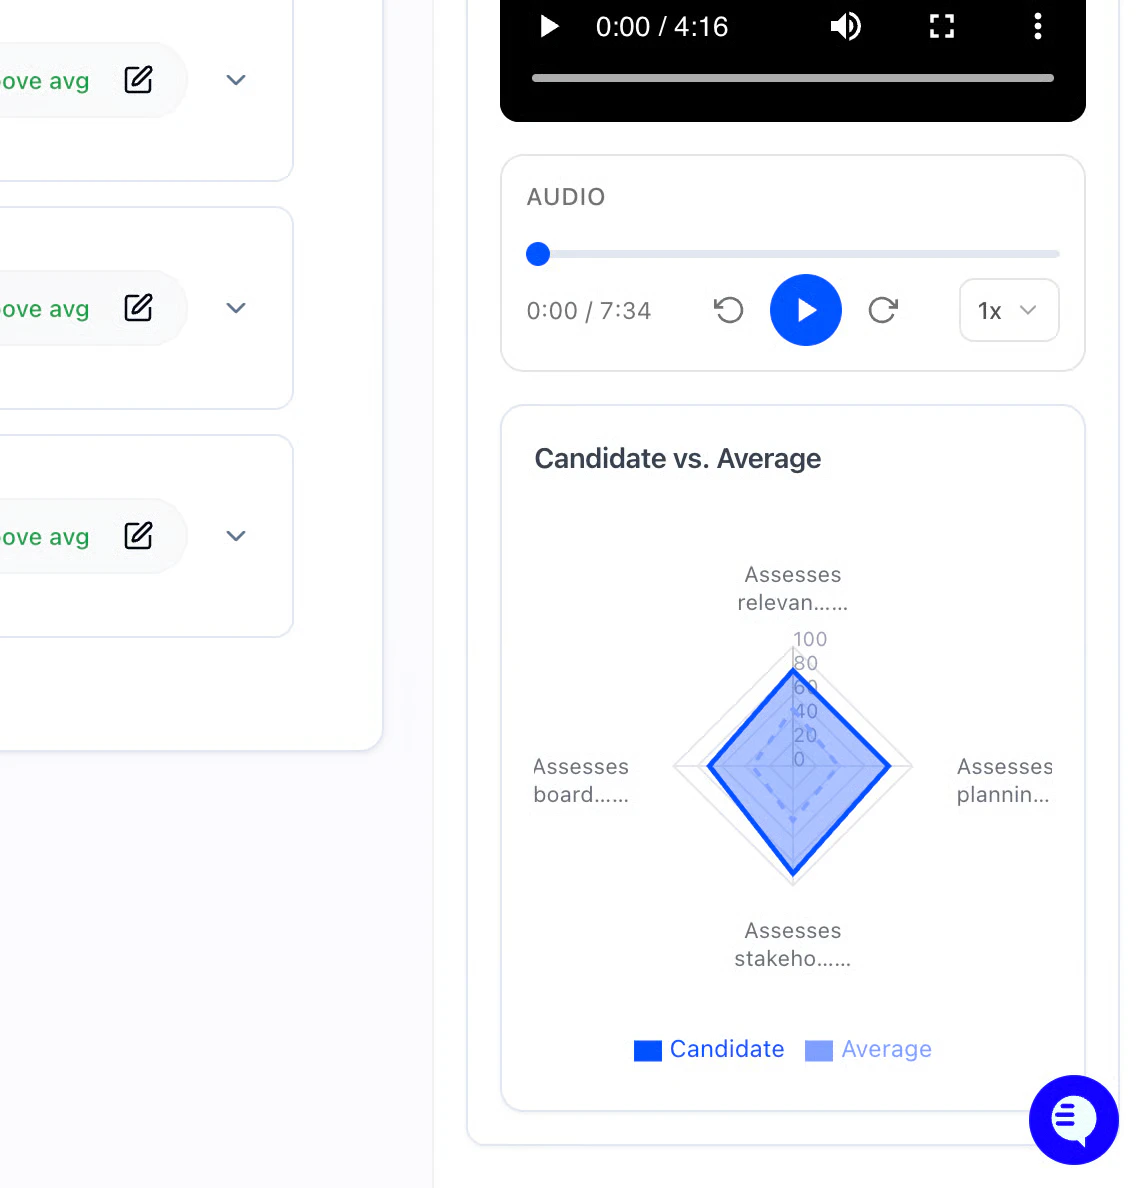
Candidate vs. Average
On the Scorecard, HeyMilo compares this candidate to other people who completed the same interviewer.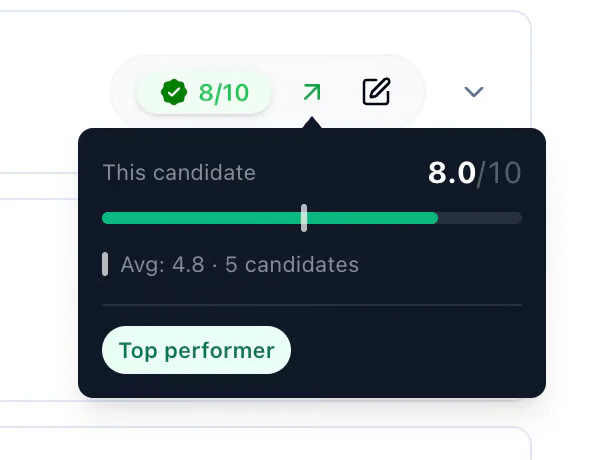
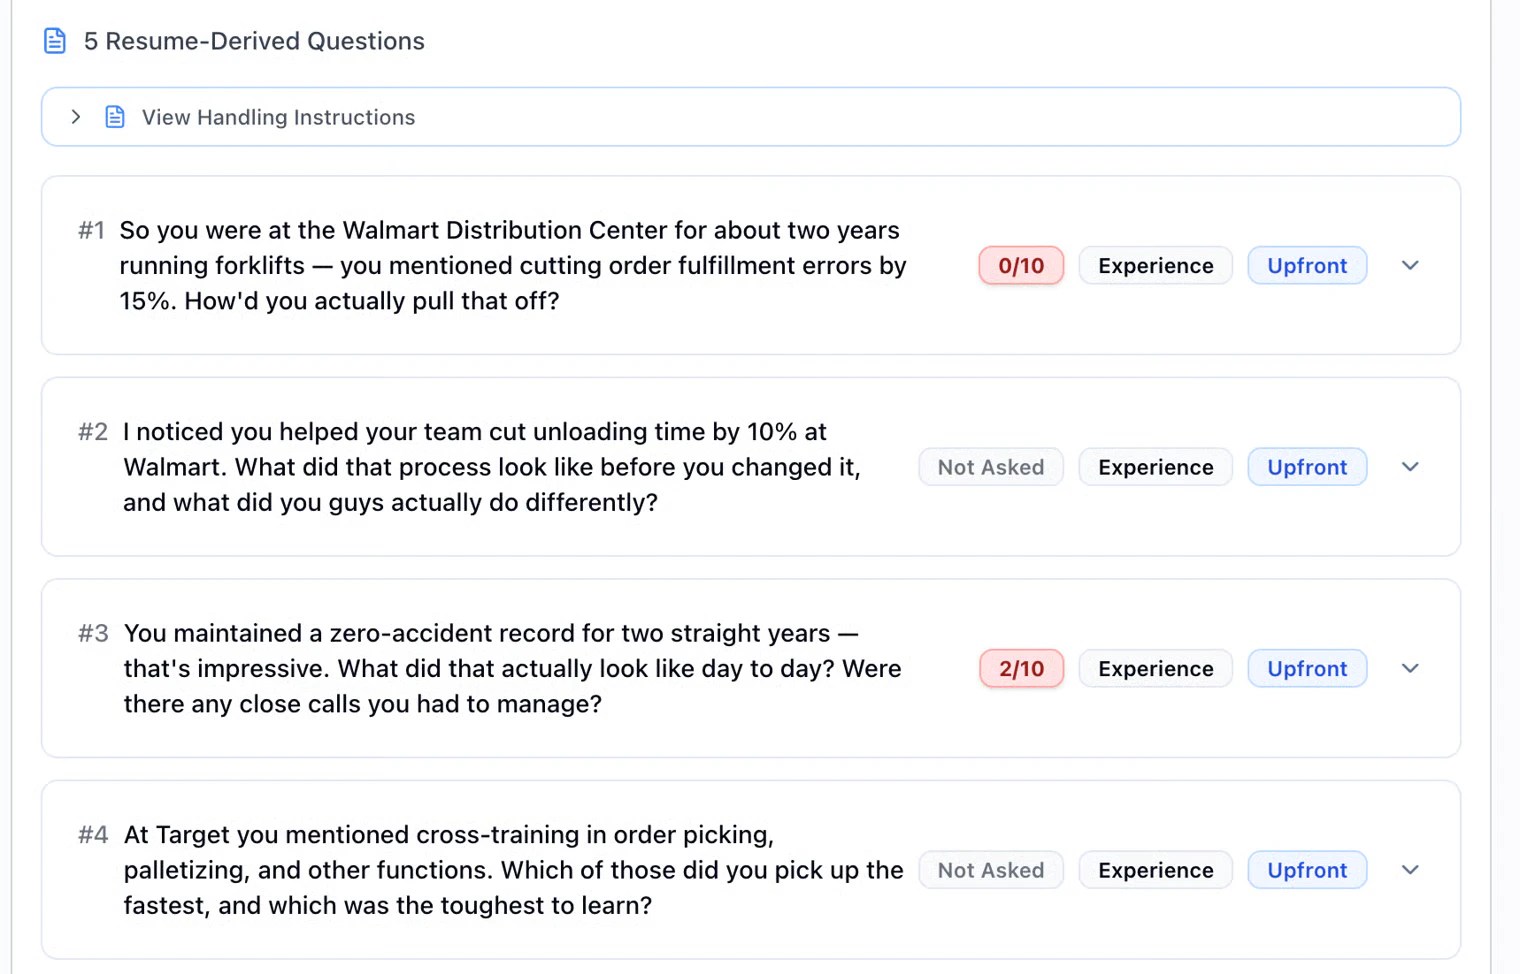
Résumé-based questions on the call
Want the AI to dig into their résumé during a voice or video interview? When you build the interviewer, open the Voice Interview step and use Tools. Turn on the toggle Resume Questions. Keep a résumé step before voice in the workflow so there’s something to pull from. So, when you review someone: Voice Interview → Resume-Derived Questions.- Upfront = meant early,
- Deferred = meant later.
- Not Asked means the AI didn’t get to that prompt
6. Diagnostics
The Diagnostics tab shows how a candidate completed the interview — use it when a score surprises you, someone didn’t finish, or you want more context before shortlisting. Where: Open a candidate → Diagnostics.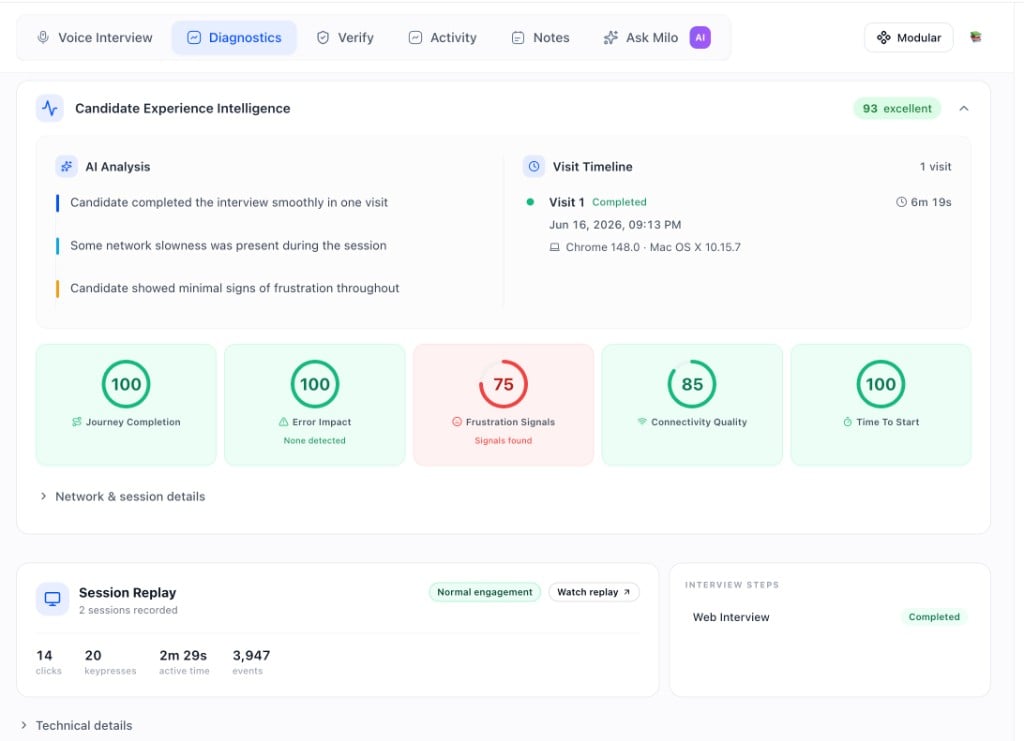
- Candidate Experience Intelligence: Overall experience score (e.g. 88 · excellent) plus AI Analysis bullets summarizing the session (e.g. “completed on first attempt,” “media permission errors but candidate persisted,” “slower internet detected”).
- Visit Timeline: Each visit with status (Completed / in progress), duration, timestamp, and browser / OS (e.g. Chrome 148 · Mac OS X).
- Experience metrics: Scores for Journey Completion, Error Impact, Frustration Signals, Connectivity Quality, and Time to Start. Helps separate fit issues from experience issues.
- Network & session details: Connectivity chart (Avg RTT, Jitter, Packet Loss), Frustration Signals (rage click count and locations), and Candidate Rating.
- Session Replay: Play back the candidate’s screen interactions. Can take a moment to load, sensitive info is filtered, intended for internal review.
- Interview Steps: Completion status for each stage in the workflow (e.g. Web Interview · Completed).
- Technical details: IP Address and Evaluator Processing Times (e.g. Scorecard, English Proficiency, Highlights, Tags Extraction) for troubleshooting.
7. Verify tab
The Verify tab surfaces identity checks and cheat detection signals in one place. Open it from the candidate profile alongside Diagnostics, Notes, and Activity. Where: Open a candidate → Verify.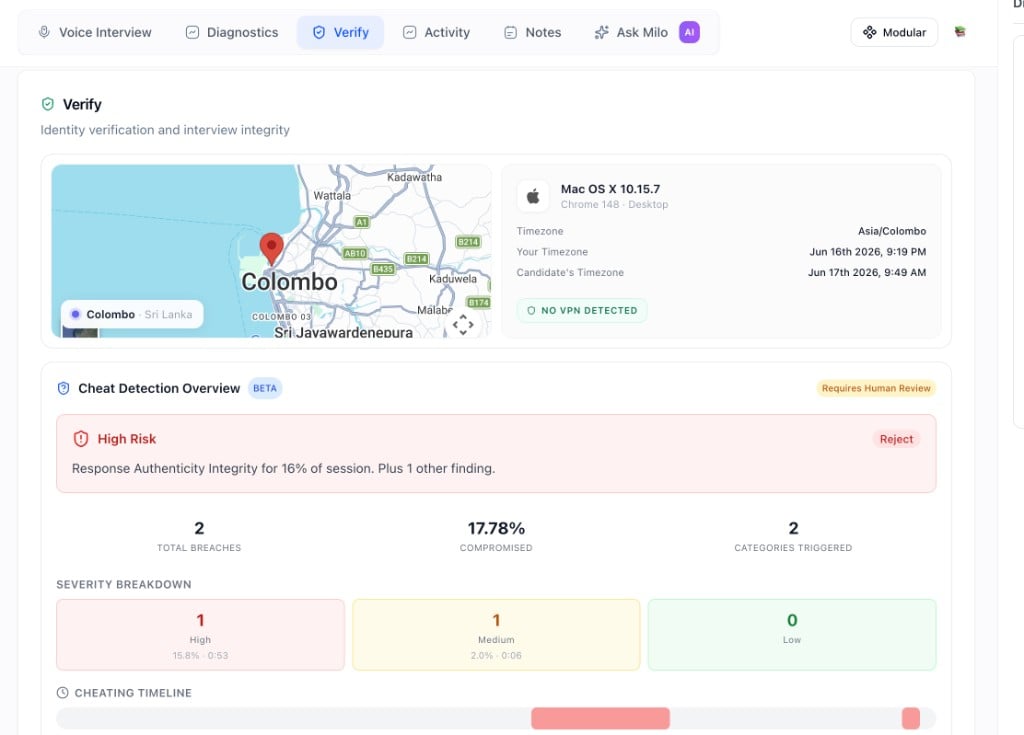
Identity Verification (Beta)
Checks the candidate’s email and phone to confirm their identity.- Email Verification: Confirms the email address is valid and deliverable.
- Phone Verification: Confirms the phone number is valid and reachable.
Cheat detection results
Surfaces behavioral and environmental signals from the interview session when Detect suspicious activity is enabled. Flags are for human review only. Nothing here auto-rejects candidates or changes their score. What you will see:- Risk level: Overall assessment with a recommended action (Reject or Further Review).
- Total Breaches: Number of flagged events in the session.
- % Compromised: Share of the session where signals were detected.
- Categories Triggered: Which detection types were activated.
- Severity Breakdown: High, medium, and low signal counts with percentage of session for each.
- Cheating Timeline: A visual timeline of when flags occurred across the interview.
- By Category: A table showing category name, severity, breach count, percentage of session, and duration.
- Breach Details: Timestamp range, severity, confidence percentage, recommended action, the candidate’s original response, and sentence-level analysis.
Flags are informational, not confirmed violations. Always review the transcript, answers, and video alongside any flags before drawing conclusions.
Notifications
Configure alerts for completions, high scores, or expirations in Settings & Admin. For the in-app bell (push, sound, click-through to candidates), see Your Dashboard.Next steps
- How Scoring Works — How scores are built and how to read the report
- Integrations — ATS sync and sending results to your ATS