> ## Documentation Index
> Fetch the complete documentation index at: https://docs.heymilo.ai/llms.txt
> Use this file to discover all available pages before exploring further.
# Creating an Interviewer
> Create your first AI interviewer, set the interview URL name, and get a shareable link — step by step.
An **interviewer** is your AI screener for one role. You set the job, pick how candidates are screened (voice, SMS, form, resume, or AI Scenario Assessment), add questions and scoring, then share a link or connect your ATS. Here's the flow you'll see in the app.
## 1. Start from the dashboard
From the dashboard, click **Create Interviewer** to start a new interview experience.
 You'll go through: **Generate Interview Plan** → **Settings** (deadline, retakes, links, budget) → **Interview Stages** → **Questions & Scoring** → **Budget & Notifications**, then share your interview.
## 2. Generate your interview plan
First, tell HeyMilo what role you're hiring for so it can suggest an interview plan.
You'll go through: **Generate Interview Plan** → **Settings** (deadline, retakes, links, budget) → **Interview Stages** → **Questions & Scoring** → **Budget & Notifications**, then share your interview.
## 2. Generate your interview plan
First, tell HeyMilo what role you're hiring for so it can suggest an interview plan.
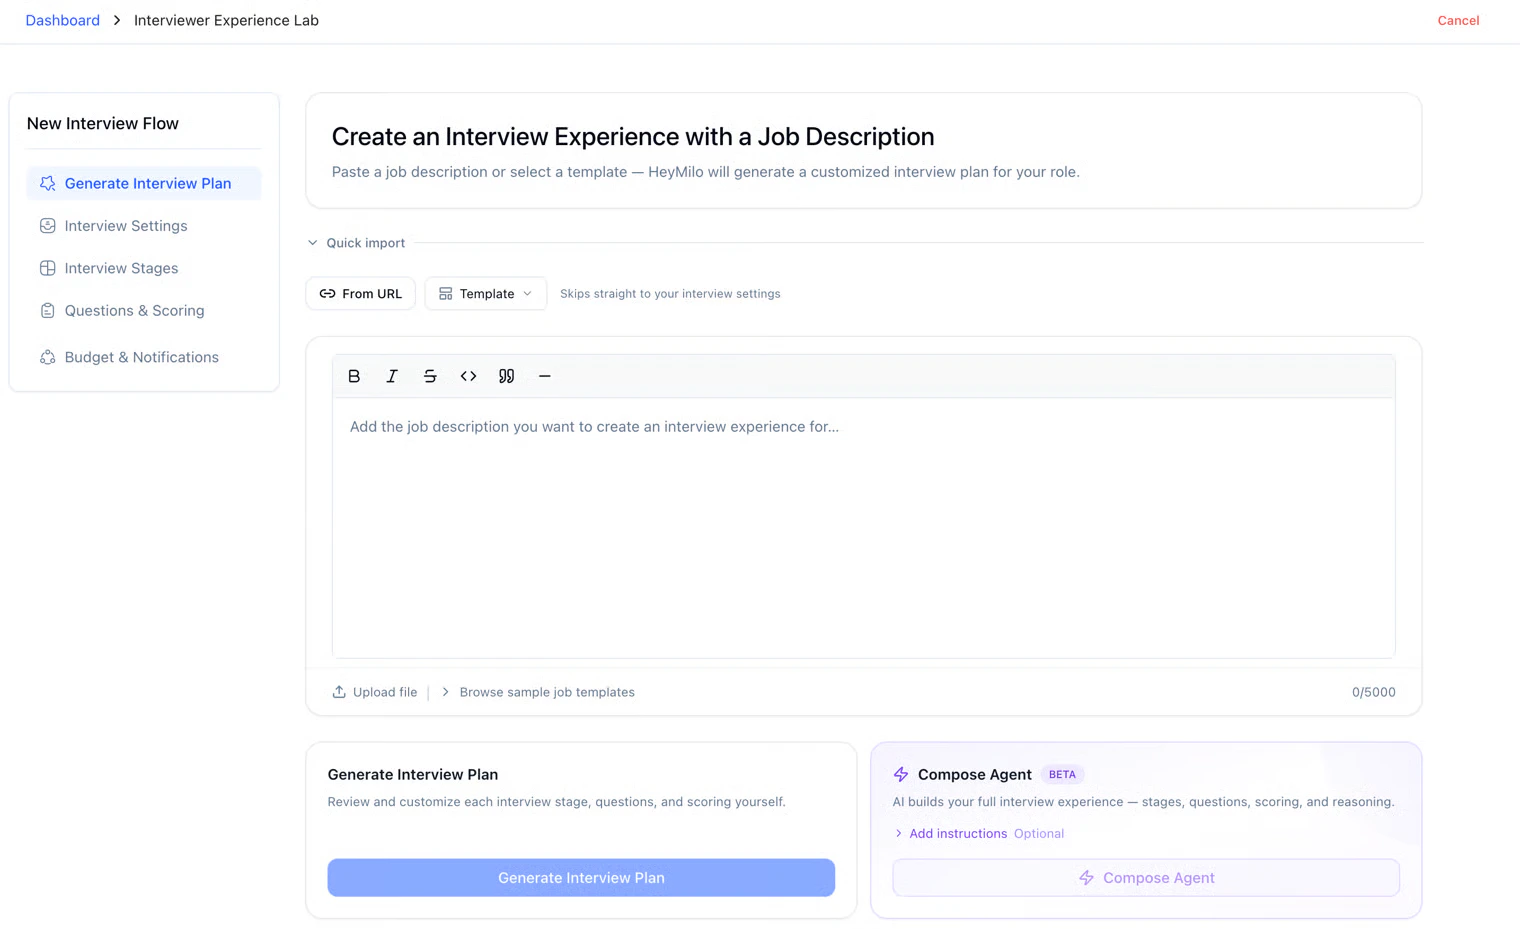 * **Paste a job description** — Paste your role description and HeyMilo will generate a customized interview plan.
* **Use a template** — Search job roles (e.g. Account Executive, Customer Support Representative) and pick a template to start from.
* **Job posting URL (optional)** — Enter a URL to pull the job description from a job posting page.
#### Compose Agent
**Compose Agent** is for when you want HeyMilo to **generate the whole interviewer for you**: **which stages to use, the questions, the scoring, and how responses are evaluated.**
* **Paste a job description** — Paste your role description and HeyMilo will generate a customized interview plan.
* **Use a template** — Search job roles (e.g. Account Executive, Customer Support Representative) and pick a template to start from.
* **Job posting URL (optional)** — Enter a URL to pull the job description from a job posting page.
#### Compose Agent
**Compose Agent** is for when you want HeyMilo to **generate the whole interviewer for you**: **which stages to use, the questions, the scoring, and how responses are evaluated.**
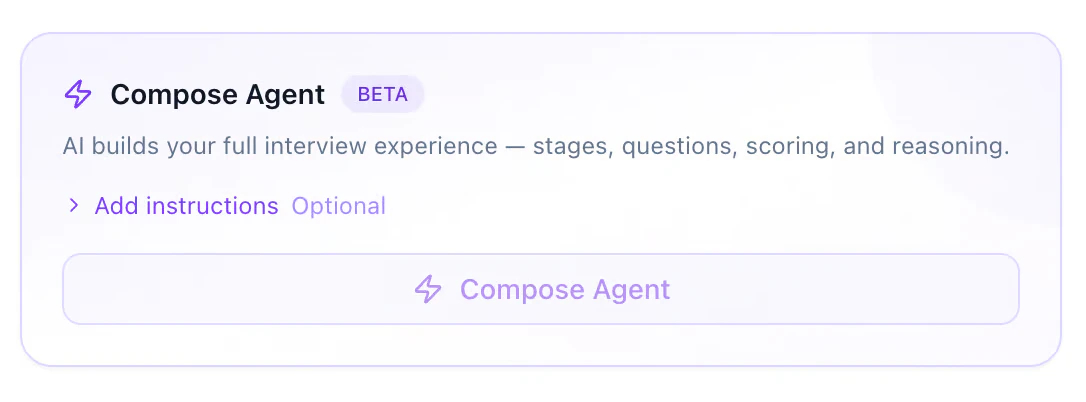 Get a **full draft workflow** to review and tweak:
* **Templates** — Pick a role template as a starting point when it fits.
* **Add instructions** — You can even say the flow you want in plain language (e.g. *SMS → resume → voice*).
* **Paste context** — Job copy, intake notes, or a **meeting transcript** so the draft matches how you actually run the screen.
Always **open the draft** and adjust stages and questions before you go live.
Pick one, then click **Generate Interview Plan**.
[→ How the Composer Agent Works](/creating-an-interviewer-composer-agent)
## 3. Configure how it looks to candidates
Next you'll see **Configure**: set how this interview appears to candidates.
### Interview URL
* **Interview URL Name** — This becomes part of the link you share (e.g. `f8e-customer-support-specialist`). You can keep the generated one or change it when creating the interviewer. After go-live, each candidate also gets a unique **Interview URL** on their profile (see [Reviewing Candidates](reviewing-candidates#interview-url)).
* **Position Title** — The role title candidates see (e.g. "Customer Support Specialist"). Has a character limit.
Get a **full draft workflow** to review and tweak:
* **Templates** — Pick a role template as a starting point when it fits.
* **Add instructions** — You can even say the flow you want in plain language (e.g. *SMS → resume → voice*).
* **Paste context** — Job copy, intake notes, or a **meeting transcript** so the draft matches how you actually run the screen.
Always **open the draft** and adjust stages and questions before you go live.
Pick one, then click **Generate Interview Plan**.
[→ How the Composer Agent Works](/creating-an-interviewer-composer-agent)
## 3. Configure how it looks to candidates
Next you'll see **Configure**: set how this interview appears to candidates.
### Interview URL
* **Interview URL Name** — This becomes part of the link you share (e.g. `f8e-customer-support-specialist`). You can keep the generated one or change it when creating the interviewer. After go-live, each candidate also gets a unique **Interview URL** on their profile (see [Reviewing Candidates](reviewing-candidates#interview-url)).
* **Position Title** — The role title candidates see (e.g. "Customer Support Specialist"). Has a character limit.
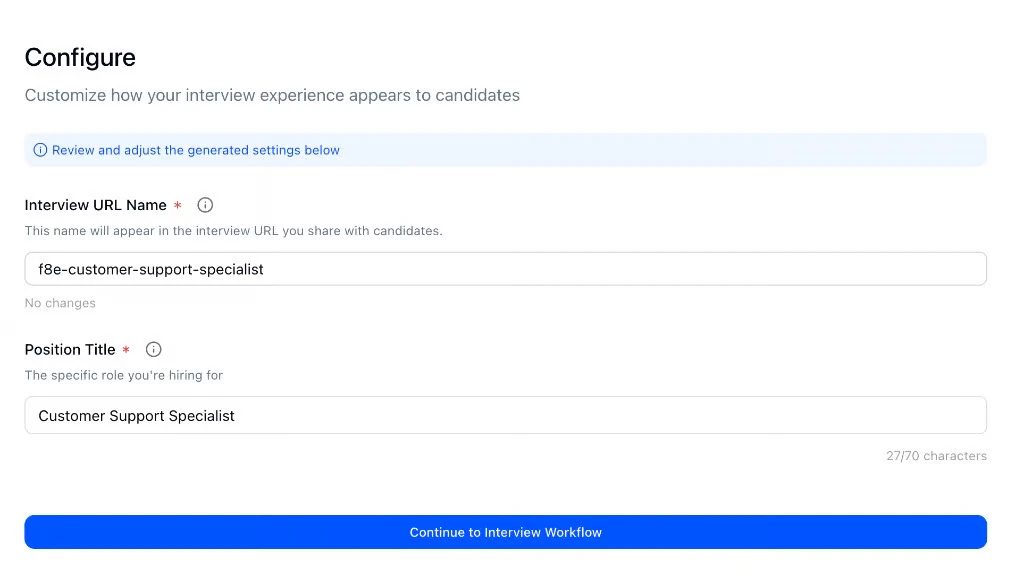 Review and adjust, then click **Continue to Interview Workflow**.
## 4. Set up your interview stages
Here you build the **sequence** of screening steps. Each step is an AI agent (voice interview, resume screening, SMS, or form).
* **Available Agents** — Voice Interview, Resume Screening, SMS Screening, Form Screening, AI Scenario Assessment. Click a card to add and configure that stage.
* **Your Interview Flow** — Stages you add appear here. Drag to reorder how candidates move through them.
* **Templates** — Use "Select a template" to quickly set up stages for common role types.
Review and adjust, then click **Continue to Interview Workflow**.
## 4. Set up your interview stages
Here you build the **sequence** of screening steps. Each step is an AI agent (voice interview, resume screening, SMS, or form).
* **Available Agents** — Voice Interview, Resume Screening, SMS Screening, Form Screening, AI Scenario Assessment. Click a card to add and configure that stage.
* **Your Interview Flow** — Stages you add appear here. Drag to reorder how candidates move through them.
* **Templates** — Use "Select a template" to quickly set up stages for common role types.
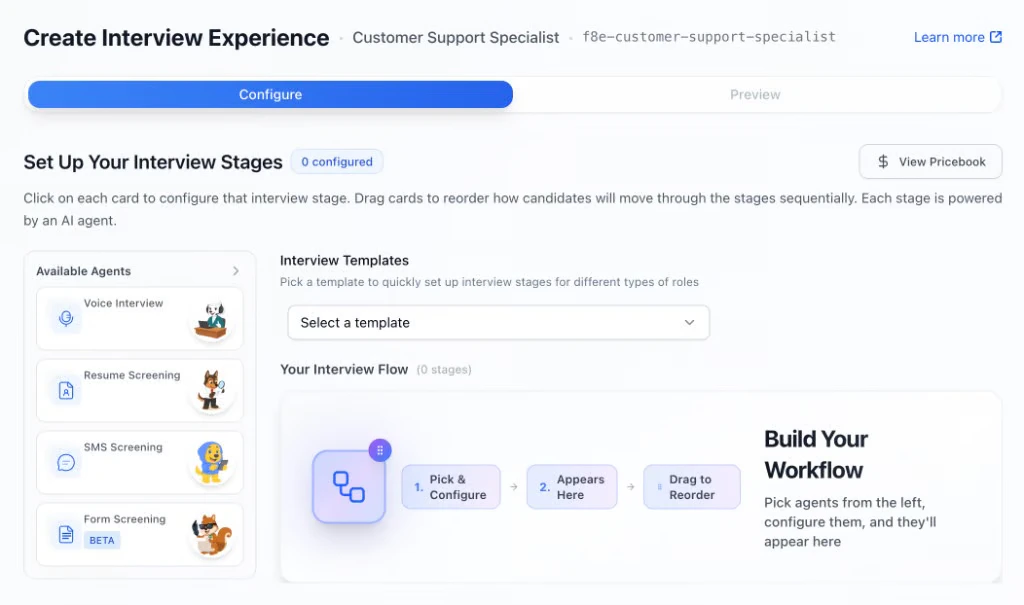 You need at least one stage before you can continue. See [Interview Types](/o/VItUMOBmvYad7vBbPm0j/s/hUHKYD7dKtFkpLa3JwsL/getting-started/log-in/interview-types) for when to use voice, SMS, form, resume, or AI Scenario Assessment.
## 5. Interview settings (optional)
Before you go live you can set:
* **Agent identity** — Single identity (seamless) or multiple (handoff experience).
* **Language** — Default interviewer language or auto-detect candidate language (BETA).
* **Timeline** — Deadline and "days to complete" after a candidate is added.
* **Retakes** — Whether candidates can retake if they don't pass.
* **Communication & branding** — Email template group, design template, phone number for SMS/voice, whether to email the report to the candidate, and candidate intake fields.
* **Budget & notifications** — Optional budget; email subscribers for completion alerts.
#### Candidate Intake Fields
If you want candidates to fill out specific fields before they start — like their LinkedIn profile, phone number, or earliest start date — use **Candidate Intake Fields** under **Communication & Branding**.
You need at least one stage before you can continue. See [Interview Types](/o/VItUMOBmvYad7vBbPm0j/s/hUHKYD7dKtFkpLa3JwsL/getting-started/log-in/interview-types) for when to use voice, SMS, form, resume, or AI Scenario Assessment.
## 5. Interview settings (optional)
Before you go live you can set:
* **Agent identity** — Single identity (seamless) or multiple (handoff experience).
* **Language** — Default interviewer language or auto-detect candidate language (BETA).
* **Timeline** — Deadline and "days to complete" after a candidate is added.
* **Retakes** — Whether candidates can retake if they don't pass.
* **Communication & branding** — Email template group, design template, phone number for SMS/voice, whether to email the report to the candidate, and candidate intake fields.
* **Budget & notifications** — Optional budget; email subscribers for completion alerts.
#### Candidate Intake Fields
If you want candidates to fill out specific fields before they start — like their LinkedIn profile, phone number, or earliest start date — use **Candidate Intake Fields** under **Communication & Branding**.
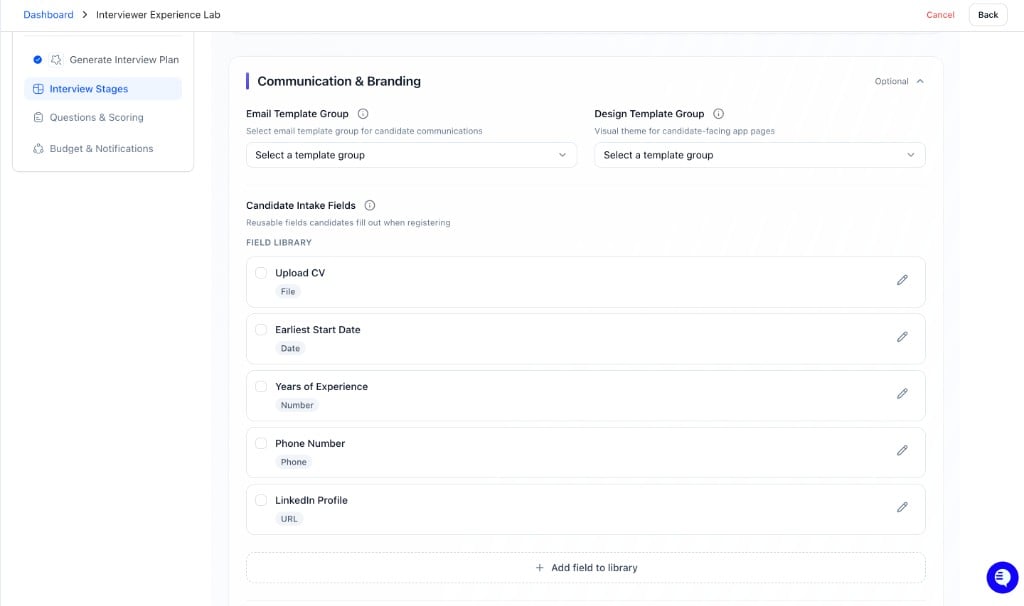 Click **Add field to library** to create fields — each field has a name and a format type (File, Date, Number, Phone, URL, etc.). Once added, check the box next to any field to include it on this interviewer. Fields saved to the library are available across all your interviewers.
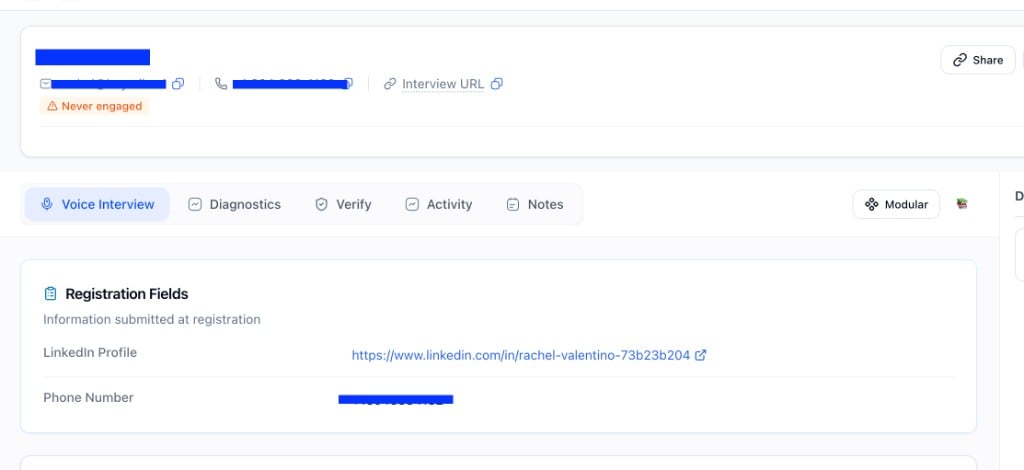
Submitted answers appear under **Registration Fields** on the candidate's profile.
Click **Add field to library** to create fields — each field has a name and a format type (File, Date, Number, Phone, URL, etc.). Once added, check the box next to any field to include it on this interviewer. Fields saved to the library are available across all your interviewers.
Submitted answers appear under **Registration Fields** on the candidate's profile.
 **How budget enforcement works:** Budget is checked when a **new candidate is invited**. Candidates **already engaged** in the flow won't be cut off mid-experience (so their interview stays intact), which means actual spend can slightly exceed budget.
**Example:** Import 1,000 candidates into an agent with a \$10 budget → HeyMilo will engage all of them and exceed the cap, because they were already invited before it kicked in.
**Recommendation:** Set a budget that matches the **number of candidates you plan to move through** the agent (per-candidate cost × planned volume + a small buffer).
You can also add a scheduling link, redirect link, and advanced settings (company info, role details, etc.).
#### Essential Settings
Under **Essential Settings**, configure how questions are generated for this experience:
* **Standard Generation** *(default)* — Fast, independent per-modality generation. Each stage (voice, SMS, form, resume) generates questions separately using dedicated prompts.
* **Adaptive Generation** *(BETA)* — Agentic generation with cross-modality awareness. Questions are generated with intelligent reuse across stages, so the overall experience feels more cohesive.
#### Timeline & expiration
**While creating the interviewer:** Settings → **Timeline & Completion**. Set when the posting **expires** for new candidates and how many **days to complete** after someone starts.
**Later on the dashboard:** Open the interviewer and check **Deadline at the top**. Edit here to **extend** dates or time to finish.
**How budget enforcement works:** Budget is checked when a **new candidate is invited**. Candidates **already engaged** in the flow won't be cut off mid-experience (so their interview stays intact), which means actual spend can slightly exceed budget.
**Example:** Import 1,000 candidates into an agent with a \$10 budget → HeyMilo will engage all of them and exceed the cap, because they were already invited before it kicked in.
**Recommendation:** Set a budget that matches the **number of candidates you plan to move through** the agent (per-candidate cost × planned volume + a small buffer).
You can also add a scheduling link, redirect link, and advanced settings (company info, role details, etc.).
#### Essential Settings
Under **Essential Settings**, configure how questions are generated for this experience:
* **Standard Generation** *(default)* — Fast, independent per-modality generation. Each stage (voice, SMS, form, resume) generates questions separately using dedicated prompts.
* **Adaptive Generation** *(BETA)* — Agentic generation with cross-modality awareness. Questions are generated with intelligent reuse across stages, so the overall experience feels more cohesive.
#### Timeline & expiration
**While creating the interviewer:** Settings → **Timeline & Completion**. Set when the posting **expires** for new candidates and how many **days to complete** after someone starts.
**Later on the dashboard:** Open the interviewer and check **Deadline at the top**. Edit here to **extend** dates or time to finish.
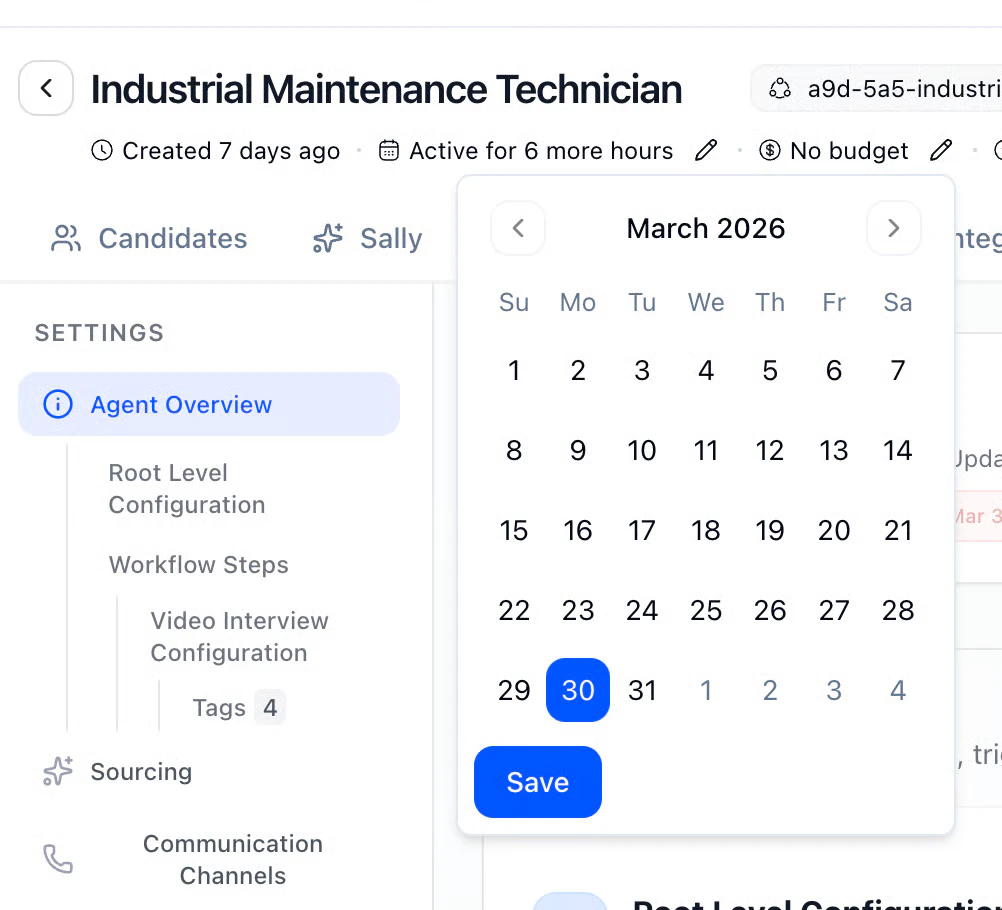 **Link expired or invalid?:** Almost always check the posting **expiration** or **days to complete.**
## 6. Questions & scoring
For each stage (e.g. Voice Interview), open **Set Up Your Interview Questions**.
* **Add questions** — Your own, from the [Question Library](/o/VItUMOBmvYad7vBbPm0j/s/hUHKYD7dKtFkpLa3JwsL/interviews/interviews/question-library), or reuse from another interviewer. You can reorder and set how many follow-ups the AI can ask.
* **Evaluation criteria** — For each question, define what a strong vs weak answer looks like (rubric). Set a **weight** so more important questions count more toward the score.
* **Enforce objective evaluation** — Optional: require candidates to meet a minimum score to pass.
**Link expired or invalid?:** Almost always check the posting **expiration** or **days to complete.**
## 6. Questions & scoring
For each stage (e.g. Voice Interview), open **Set Up Your Interview Questions**.
* **Add questions** — Your own, from the [Question Library](/o/VItUMOBmvYad7vBbPm0j/s/hUHKYD7dKtFkpLa3JwsL/interviews/interviews/question-library), or reuse from another interviewer. You can reorder and set how many follow-ups the AI can ask.
* **Evaluation criteria** — For each question, define what a strong vs weak answer looks like (rubric). Set a **weight** so more important questions count more toward the score.
* **Enforce objective evaluation** — Optional: require candidates to meet a minimum score to pass.
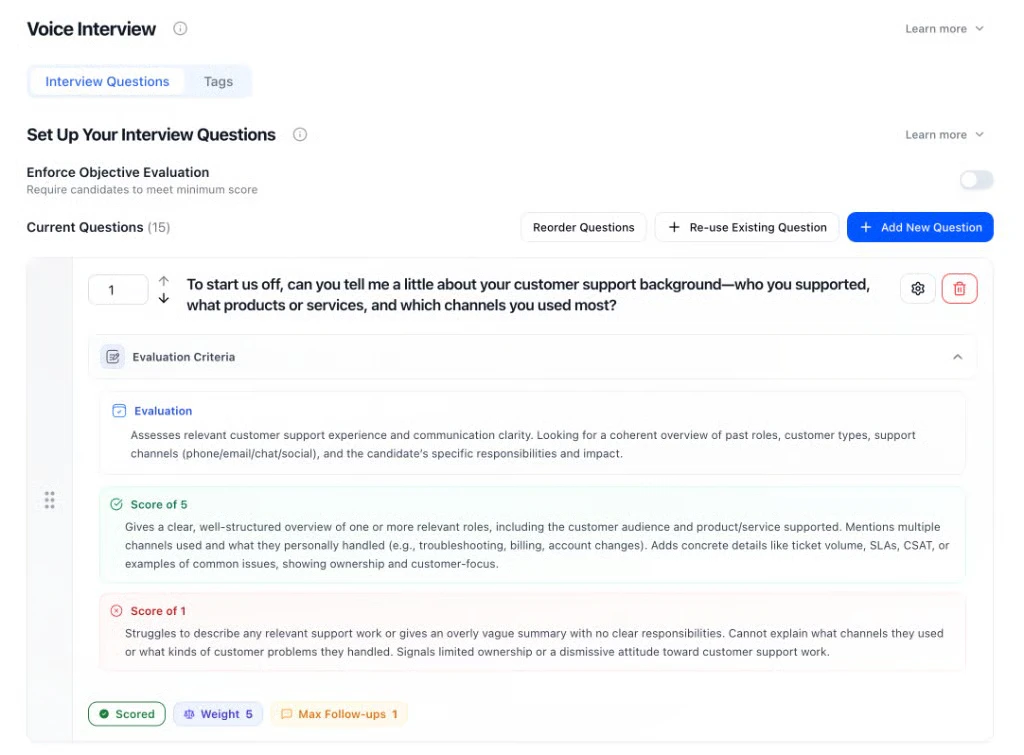 Details: [Configuring Your AI Interviewer](/o/VItUMOBmvYad7vBbPm0j/s/hUHKYD7dKtFkpLa3JwsL/getting-started/log-in/configuring-your-ai-interviewer) and [How Scoring Works](/o/VItUMOBmvYad7vBbPm0j/s/hUHKYD7dKtFkpLa3JwsL/getting-started/log-in/how-scoring-works).
## 7. Share your interview
When setup is done, you'll see **Share with Candidates**:
* **Interview link** — Copy and share this link so candidates can start the interview. You can also print a poster.
* **Connect to your ATS** — Connect an ATS so candidates and results sync automatically. See [ATS Integrations & quickstarts](/o/VItUMOBmvYad7vBbPm0j/s/hUHKYD7dKtFkpLa3JwsL/integrations/ats-quickstarts).
* **Ingest** — Use the webhook or ingestion gateway to send candidates from job boards, your site, or other tools.
From there you can return to the dashboard, go to the agent, or set up ingestion.
## Quick tips
* **Clone to save time** — Clone an existing interviewer from the dashboard to reuse stages, questions, and settings, then adjust. You can also use the Clone an interviewer API (Next Gen reference).
* **Start simple** — One voice or one SMS stage is enough to begin. Add more stages once you're comfortable.
* **Preview** — Use **Preview** in the top nav to see how the interview looks to candidates before you share.
## Next steps
* [Interview Types](/o/VItUMOBmvYad7vBbPm0j/s/hUHKYD7dKtFkpLa3JwsL/getting-started/log-in/interview-types) — Voice, SMS, form, resume: when to use each
* [Configuring Your AI Interviewer](/o/VItUMOBmvYad7vBbPm0j/s/hUHKYD7dKtFkpLa3JwsL/getting-started/log-in/configuring-your-ai-interviewer) — Questions, rubrics, and settings in depth
* [Inviting Candidates & Driving Completion](/o/VItUMOBmvYad7vBbPm0j/s/hUHKYD7dKtFkpLa3JwsL/inviting-candidates/inviting-candidates) — Get candidates to complete
Details: [Configuring Your AI Interviewer](/o/VItUMOBmvYad7vBbPm0j/s/hUHKYD7dKtFkpLa3JwsL/getting-started/log-in/configuring-your-ai-interviewer) and [How Scoring Works](/o/VItUMOBmvYad7vBbPm0j/s/hUHKYD7dKtFkpLa3JwsL/getting-started/log-in/how-scoring-works).
## 7. Share your interview
When setup is done, you'll see **Share with Candidates**:
* **Interview link** — Copy and share this link so candidates can start the interview. You can also print a poster.
* **Connect to your ATS** — Connect an ATS so candidates and results sync automatically. See [ATS Integrations & quickstarts](/o/VItUMOBmvYad7vBbPm0j/s/hUHKYD7dKtFkpLa3JwsL/integrations/ats-quickstarts).
* **Ingest** — Use the webhook or ingestion gateway to send candidates from job boards, your site, or other tools.
From there you can return to the dashboard, go to the agent, or set up ingestion.
## Quick tips
* **Clone to save time** — Clone an existing interviewer from the dashboard to reuse stages, questions, and settings, then adjust. You can also use the Clone an interviewer API (Next Gen reference).
* **Start simple** — One voice or one SMS stage is enough to begin. Add more stages once you're comfortable.
* **Preview** — Use **Preview** in the top nav to see how the interview looks to candidates before you share.
## Next steps
* [Interview Types](/o/VItUMOBmvYad7vBbPm0j/s/hUHKYD7dKtFkpLa3JwsL/getting-started/log-in/interview-types) — Voice, SMS, form, resume: when to use each
* [Configuring Your AI Interviewer](/o/VItUMOBmvYad7vBbPm0j/s/hUHKYD7dKtFkpLa3JwsL/getting-started/log-in/configuring-your-ai-interviewer) — Questions, rubrics, and settings in depth
* [Inviting Candidates & Driving Completion](/o/VItUMOBmvYad7vBbPm0j/s/hUHKYD7dKtFkpLa3JwsL/inviting-candidates/inviting-candidates) — Get candidates to complete