> ## Documentation Index
> Fetch the complete documentation index at: https://docs.heymilo.ai/llms.txt
> Use this file to discover all available pages before exploring further.
# Access
> Invite teammates, set what each person can do with roles, and control which postings they see with teams. All in one place under Settings → Access.
Open **Settings → Access** under **Workspace**.
Access is where you manage who's in your workspace and what they can do. It has three tabs:
| Tab | What it controls |
| ---------- | -------------------------------------------------- |
| **People** | Who's in the workspace, their role, and their team |
| **Roles** | What people can do (permissions) |
| **Teams** | Which postings people see |
Roles control what people can do. Teams control which postings they see. Each person has one role and can be on one or more teams.
## People
 ### Invite a teammate
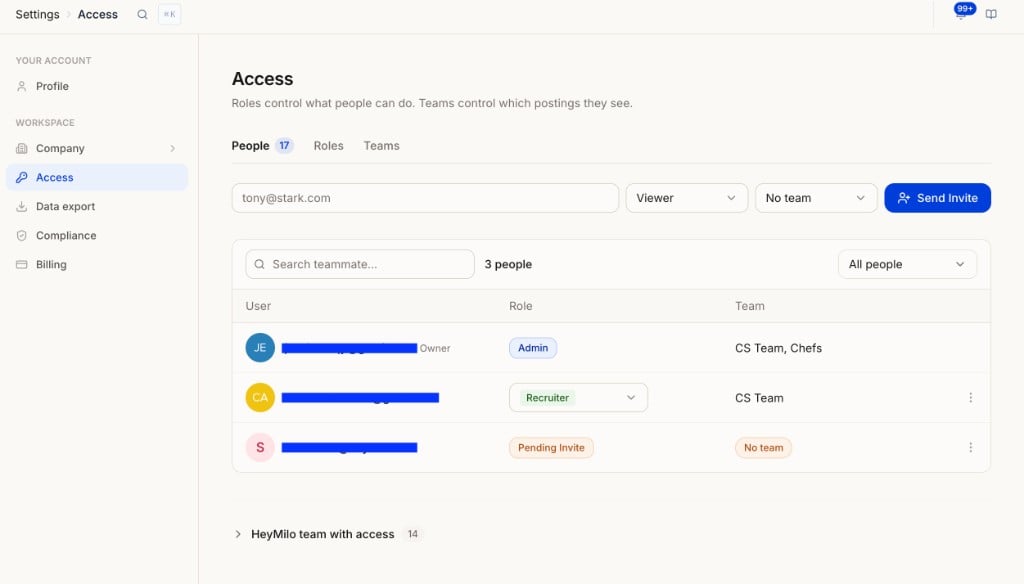
Type the address in the invite field at the top of the People tab.
Choose **Admin**, **Recruiter**, **Viewer**, or one of your custom roles. Not sure? Start with **Viewer** and upgrade later.
Choose a team, or leave **No team**. See [Teams](#teams) for what that means for what they can see.
They get an email to join. Until they accept, they show as **Pending Invite** in the list.
### The people list
| Column | What it shows |
| -------- | ---------------------------------------------------------------------------------------------------------------- |
| **User** | Email and initials. The workspace owner is labeled **Owner**. |
| **Role** | Current role. Use the dropdown to change it. The owner's role is fixed. Pending invites show **Pending Invite**. |
| **Team** | The teams the person is on (for example *CS Team, Chefs*), or **No team**. |
Use **Search teammate** to find someone by email, and the **All people** dropdown to filter the list. The count next to the search bar (for example **3 people**) is your own team. The **People** tab badge is higher because it includes HeyMilo staff.
### HeyMilo team with access
At the bottom of the People tab, **HeyMilo team with access** lists HeyMilo staff (your CS Manager and support) who can view your workspace to help you. They're kept separate from your own people.
### Manage a teammate
### Invite a teammate
Type the address in the invite field at the top of the People tab.
Choose **Admin**, **Recruiter**, **Viewer**, or one of your custom roles. Not sure? Start with **Viewer** and upgrade later.
Choose a team, or leave **No team**. See [Teams](#teams) for what that means for what they can see.
They get an email to join. Until they accept, they show as **Pending Invite** in the list.
### The people list
| Column | What it shows |
| -------- | ---------------------------------------------------------------------------------------------------------------- |
| **User** | Email and initials. The workspace owner is labeled **Owner**. |
| **Role** | Current role. Use the dropdown to change it. The owner's role is fixed. Pending invites show **Pending Invite**. |
| **Team** | The teams the person is on (for example *CS Team, Chefs*), or **No team**. |
Use **Search teammate** to find someone by email, and the **All people** dropdown to filter the list. The count next to the search bar (for example **3 people**) is your own team. The **People** tab badge is higher because it includes HeyMilo staff.
### HeyMilo team with access
At the bottom of the People tab, **HeyMilo team with access** lists HeyMilo staff (your CS Manager and support) who can view your workspace to help you. They're kept separate from your own people.
### Manage a teammate
Change someone's role
On the People tab, click the role dropdown on their row and pick the new role. It applies right away.
Change someone's team
Go to the **Teams** tab, open the **⋮** menu on the team, and add or remove the person there. Someone can be on more than one team.
Remove someone from the workspace
On the People tab, open the **⋮** menu on their row and choose **Remove from Workspace**. They lose access right away.
Resend an invite
Find the **Pending Invite** row, open the **⋮** menu, and choose **Resend Invite**.
## Roles
Roles decide what a person can do anywhere in the workspace.
 ### System roles
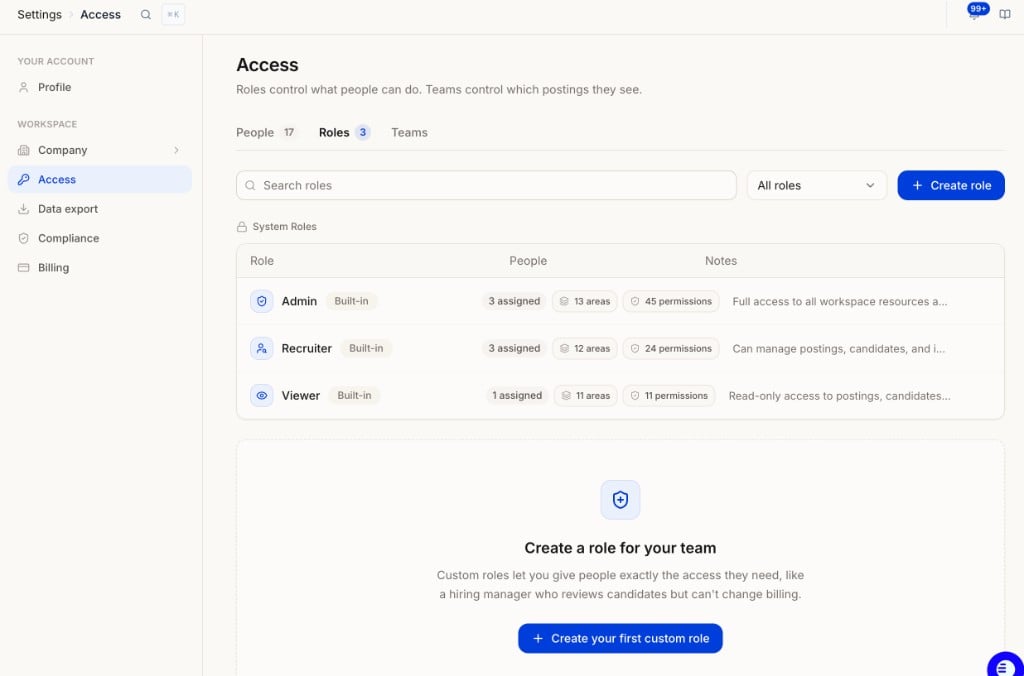
Three **Built-in** roles come with every workspace. You can't edit them.
| Role | What it allows |
| ------------- | -------------------------------------------------------------------------------------------------------------- |
| **Admin** | Full access to all workspace resources and settings |
| **Recruiter** | Can manage postings, candidates, and interviews. Can't change workspace settings or billing. |
| **Viewer** | Read-only access to postings, candidates, and interviews. Good for hiring managers who review without editing. |
Each row shows how many people are assigned, how many **areas** of the product the role can reach, and how many individual **permissions** it includes. Click a role to see the full list.
Use **Search roles** and the **All roles** dropdown to filter once you have custom roles.
### Create a custom role
Custom roles give people exactly the access they need, like a hiring manager who reviews candidates but can't change billing.
Go to **Settings → Access → Roles** and click **Create role** (or **Create your first custom role** if you don't have any yet).
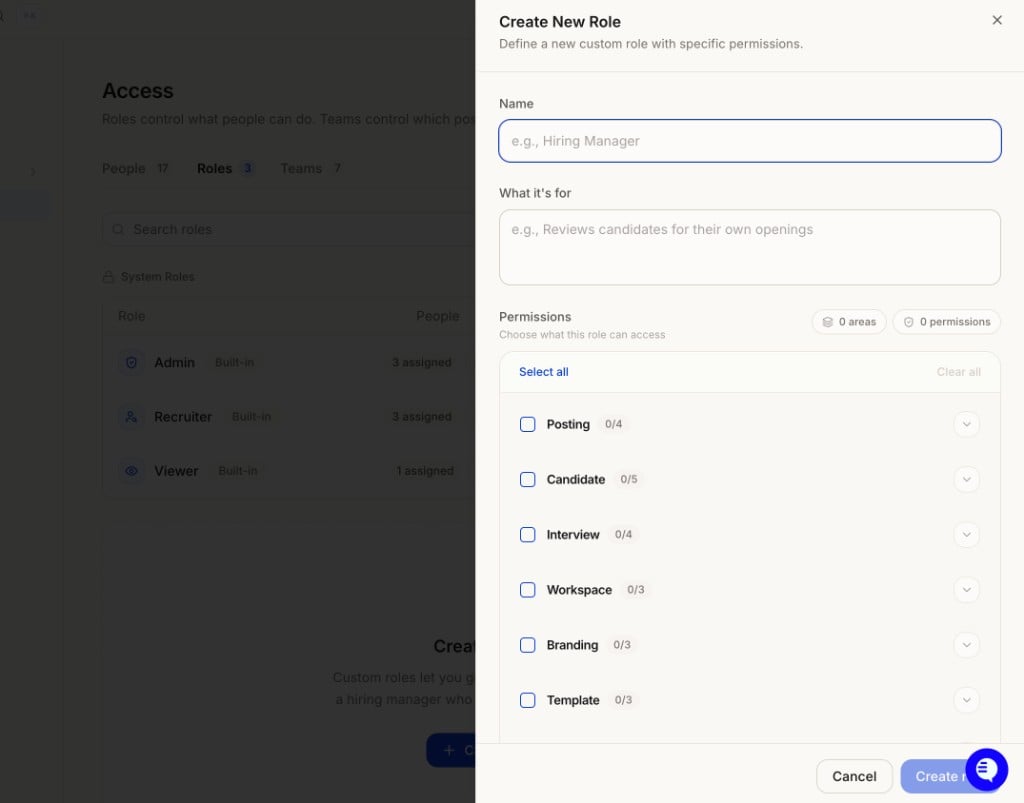
Enter a **Name** (for example *Hiring Manager*) and a short note under **What it's for** (for example *Reviews candidates for their own openings*). The note shows in the Roles list so teammates know when to use it.
Expand each category and tick the permissions you want. **Select all** and **Clear all** are at the top. The counters on the right show how many areas and permissions you've picked so far.
Then assign it to people from the **People** tab using the role dropdown.
### System roles
Three **Built-in** roles come with every workspace. You can't edit them.
| Role | What it allows |
| ------------- | -------------------------------------------------------------------------------------------------------------- |
| **Admin** | Full access to all workspace resources and settings |
| **Recruiter** | Can manage postings, candidates, and interviews. Can't change workspace settings or billing. |
| **Viewer** | Read-only access to postings, candidates, and interviews. Good for hiring managers who review without editing. |
Each row shows how many people are assigned, how many **areas** of the product the role can reach, and how many individual **permissions** it includes. Click a role to see the full list.
Use **Search roles** and the **All roles** dropdown to filter once you have custom roles.
### Create a custom role
Custom roles give people exactly the access they need, like a hiring manager who reviews candidates but can't change billing.
Go to **Settings → Access → Roles** and click **Create role** (or **Create your first custom role** if you don't have any yet).
Enter a **Name** (for example *Hiring Manager*) and a short note under **What it's for** (for example *Reviews candidates for their own openings*). The note shows in the Roles list so teammates know when to use it.
Expand each category and tick the permissions you want. **Select all** and **Clear all** are at the top. The counters on the right show how many areas and permissions you've picked so far.
Then assign it to people from the **People** tab using the role dropdown.
 ### Permission categories
| Category | What it controls |
| ------------- | -------------------------------------- |
| **Posting** | Interviewers (agents) and job postings |
| **Candidate** | Viewing and managing candidates |
| **Interview** | Interview settings |
| **Workspace** | Company and workspace settings |
| **Branding** | How your company looks to candidates |
| **Template** | Reusable interview templates |
Each category shows how many of its permissions are on (for example **Candidate 0/5**). Scroll the panel for the full list.
## Teams
Teams decide which postings a person sees. Use them to split the workspace by department, region, or client.
### Permission categories
| Category | What it controls |
| ------------- | -------------------------------------- |
| **Posting** | Interviewers (agents) and job postings |
| **Candidate** | Viewing and managing candidates |
| **Interview** | Interview settings |
| **Workspace** | Company and workspace settings |
| **Branding** | How your company looks to candidates |
| **Template** | Reusable interview templates |
Each category shows how many of its permissions are on (for example **Candidate 0/5**). Scroll the panel for the full list.
## Teams
Teams decide which postings a person sees. Use them to split the workspace by department, region, or client.
 ### Postings with no team
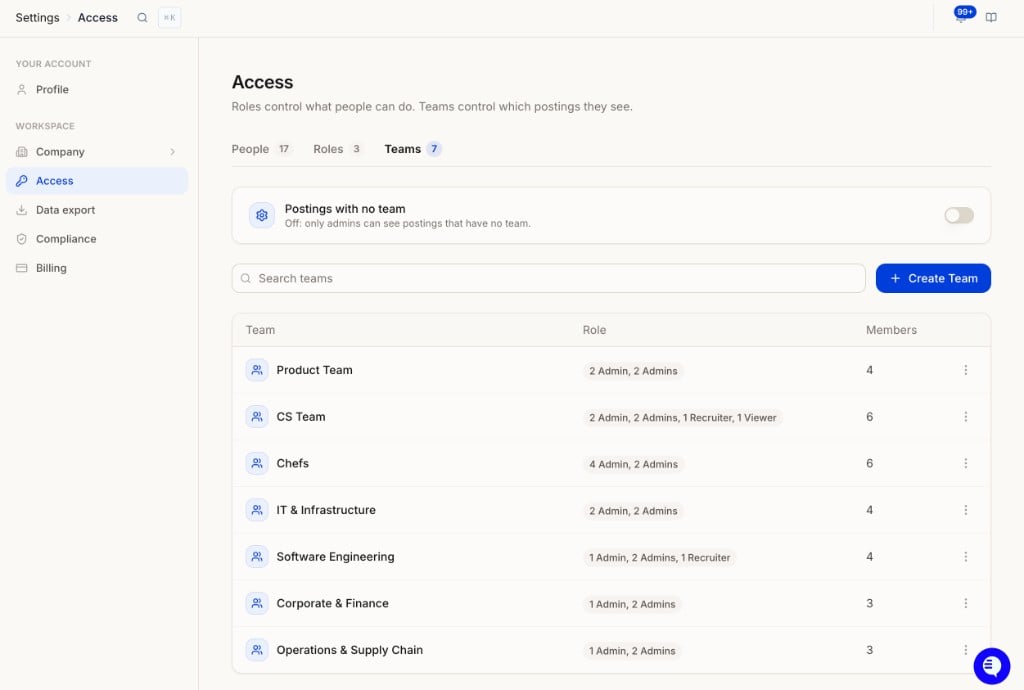
The toggle at the top decides who can see postings that aren't assigned to any team.
* **Off** (default): only Admins can see postings with no team.
* **On**: everyone in the workspace can see them.
If you don't use teams at all, turn this **on** so your whole team sees every posting.
### Manage teams
* **Create a team**: click **+ Create Team**, name it (for example *Software Engineering*, *CS Team*, *Chefs*), and add members.
* **Find a team**: use **Search teams**.
* **Edit or delete a team**: open the **⋮** menu on the row to rename it, change members, or delete it.
The table shows each team's **Role** breakdown (how many Admins, Recruiters, and Viewers are on it) and its total **Members**.
### How teams and postings connect
* A person can be on more than one team. They see every posting assigned to any of their teams.
* Each interviewer belongs to one team at a time. When you create one, it goes into whichever team you have selected.
* To move an interviewer, open it, click **Actions**, then **Assign to team**.
* Admins see all postings regardless of team.
## Common setups
| You want | Do this |
| ---------------------------------------------- | --------------------------------------------------------------------------------------------------------------------- |
| Everyone sees everything | Skip teams. Leave people on **No team** and turn **Postings with no team** on. |
| Recruiters see only their region's roles | One team per region. Assign each interviewer to its region's team. |
| A hiring manager reviews one role's candidates | Give them **Viewer** (or a custom role with candidate access only) and put them on a team that has just that posting. |
| An agency runs hiring for several clients | One team per client. Recruiters on a client's team see only that client's postings. |
### Related pages
* [Company → General](company-general): company name, logo, and location
* [Billing](billing): plan, credits, and usage
* [Compliance](compliance): data retention and deletion requests
### Postings with no team
The toggle at the top decides who can see postings that aren't assigned to any team.
* **Off** (default): only Admins can see postings with no team.
* **On**: everyone in the workspace can see them.
If you don't use teams at all, turn this **on** so your whole team sees every posting.
### Manage teams
* **Create a team**: click **+ Create Team**, name it (for example *Software Engineering*, *CS Team*, *Chefs*), and add members.
* **Find a team**: use **Search teams**.
* **Edit or delete a team**: open the **⋮** menu on the row to rename it, change members, or delete it.
The table shows each team's **Role** breakdown (how many Admins, Recruiters, and Viewers are on it) and its total **Members**.
### How teams and postings connect
* A person can be on more than one team. They see every posting assigned to any of their teams.
* Each interviewer belongs to one team at a time. When you create one, it goes into whichever team you have selected.
* To move an interviewer, open it, click **Actions**, then **Assign to team**.
* Admins see all postings regardless of team.
## Common setups
| You want | Do this |
| ---------------------------------------------- | --------------------------------------------------------------------------------------------------------------------- |
| Everyone sees everything | Skip teams. Leave people on **No team** and turn **Postings with no team** on. |
| Recruiters see only their region's roles | One team per region. Assign each interviewer to its region's team. |
| A hiring manager reviews one role's candidates | Give them **Viewer** (or a custom role with candidate access only) and put them on a team that has just that posting. |
| An agency runs hiring for several clients | One team per client. Recruiters on a client's team see only that client's postings. |
### Related pages
* [Company → General](company-general): company name, logo, and location
* [Billing](billing): plan, credits, and usage
* [Compliance](compliance): data retention and deletion requests